If your stitches are too loose, too tight, or your fabric is puckering like it's mad at you, it might be time to check your tension settings. Understanding how sewing machine tension works can feel like decoding a secret language, but once you get the hang of it, it’s a total game-changer.
Let’s break it down in plain English (no engineering degree required).
🧵 What Is Sewing Machine Tension, Anyway?
Tension controls how tightly the top thread and bobbin thread pull against each other to form a stitch. If one is pulling harder than the other, your stitches can look messy, looped, tight, or uneven.
There are two main tension sources:
-
Top thread tension: Usually controlled by a numbered dial on your machine.
-
Bobbin thread tension: Adjusted with a tiny screw on the bobbin case (though this rarely needs changing unless you're doing something fancy, like free-motion quilting or embroidery).
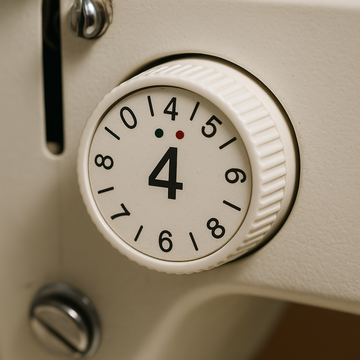
🔢 How to Read the Tension Dial
Most machines have a dial ranging from 0 to 9, with 4 or 5 being the default “sweet spot” for medium-weight fabric and all-purpose thread.
-
Lower numbers (0–3): Looser tension
-
Higher numbers (6–9): Tighter tension
Adjusting this changes how much resistance the thread has as it feeds through the machine.
👀 What Should a Balanced Stitch Look Like?
In a perfect world:
-
The top and bobbin threads meet in the middle of the fabric layers.
-
You won’t see the bobbin thread on the top or the top thread on the underside.
-
Stitches lie flat and look even on both sides.
🚨 Common Tension Problems & What They Mean
| Problem | What It Looks Like | Likely Fix |
|---|---|---|
| Loopy stitches on the bottom | Top thread too loose | Increase top tension |
| Bobbin thread showing on top | Top thread too tight | Decrease top tension |
| Fabric puckering | Top tension too high OR wrong needle/thread | Decrease tension and check needle size |
| Uneven or skipped stitches | May not be tension-related | Rethread, check needle, clean machine |
🛠 How to Adjust Sewing Machine Tension (Step-by-Step)
-
Rethread your machine. 90% of tension issues come from a thread that jumped out of a guide. BONUS: "floss" your thread through each step to make sure it's really in there and between the tension disks.
-
Start with the dial at 4 or 5.
-
Test on scrap fabric that's the same as your project.
-
Adjust in small increments. A little goes a long way.
-
Sew, check, and repeat until stitches are balanced.
🧵 Pro Tips
-
Always thread your machine with the presser foot up to ensure the tension discs open fully.
-
Use high-quality thread; cheap thread causes more tension headaches than it's worth.
-
If you’ve cleaned, rethreaded, and adjusted everything and it’s still off… it might be time to change your needle.
✨ Don’t Fear the Tension Dial
Tension isn’t the enemy; it’s just misunderstood. Once you get familiar with how your machine behaves on different fabrics, adjusting tension becomes second nature.
Want your stitches to look as professional as your patterns? Keep that needle fresh and your tension balanced.
Happy sewing!
-E